Showing posts with label paradox. Show all posts

Wednesday, October 15, 2014

SAIL OKLAHOMA 2014: part 2

photo by Sean Mulligan
It was cold and wet, but I had a BLAST!! I got to see friends I haven't seen since my Texas departure, and made many new friends. Mike and Jackie Monies did it again!

My flight out of Key West was not smooth, but I did make it, and Jackie was patiently waiting for me when I arrived in Tulsa. Jackie is a sweetheart.

This weekend, the Monies' backyard was filled with tents, campers, and excited boatbuilders. The rain changed the schedule at times, but gave everyone the opportunity to visit with others instead of isolated in their boat on the water. There was still sailing time, and the weather was good on Sunday.

photo by Scott Widmier


On Saturday, SCOUT was put in the water. Sean graciously offered me the opportunity to sail her. I had already sailed her a million miles in my mind, but had never had my hand on the tiller… today was the day. Sean and I climbed in, pushed off, and Sean took us out. After we were past the stumps… yes there were stumps above and just below the surface. This made me a little nervous, I didn't want to be the one to knock a hole in Sean's boat and sink her with all the spectators on the beach with cameras. Once we were out a ways, Sean and I switched places and I took the tiller. There were many people watching, a couple of boats came out to take pictures, I almost felt like the celebrities with the paparazzi following them. All eyes on us for a moment.

I do have to add, my original plan for splashing her would go like this: I would quietly take her to a nearby lake. Put her in the water, take her out, clumsily learn to sail her and then take her home. The next week, I announce her splashing and invite friends. I don't do well with everyone watching. This weekend, there were many eyes on us.


Two sets of those eyes were The Laydens. Yes, Matt and Karen Layden. For those of you that don't know who this couple is, Matt designed the Paradox. I was nervous, and excited for Matt to see my build. I am a novice boat builder, and Matt is the MASTER! When Sean and I reached the shore, Sean went to Matt and asked if he wanted to take SCOUT out for a sail. Matt commented that nobody had ever offered that before. He took a quick look at the way SCOUT was rigged, turned her around, gave her a push and jumped in. WOW!. How many get to watch Matt Layden sail a boat they built!. I stood at the water's edge shivering, waiting for Matt and SCOUT'S return. I was not leaving. I suppose he enjoyed the sail, because he was out for a while. It didn't matter how long he was out, I wasn't leaving. When he returned, I got to watch years of experience sailing a Paradox in action. His comment to me was that she sailed like she was suppose to. You don't know how good that made me feel. My head did swell a little, and I was so proud of what I had built. Matt Layden had put the stamp of approval on my work.

I tried to insert a video of Matt sailing SCOUT, and I just couldn't get it done. SO, here is a link to that video:


The next morning, Sunday morning, Sean and I were suppose to give a presentation on the building and sailing of the Paradox. I was nervous about standing in front of these builders with many years of experience, professional designers, the designer of the Paradox… and my brother that had ridden his motorcycle 10 hours just to see me give this presentation. No, there was NO PRESSURE AT ALL. I fumbled through it, mostly showing pictures but it was received well. Sean's part was great, he is used to speaking in public and played awesome video and pictures of SCOUT. Matt even commented that he would like to have one of the photographs of SCOUT under sail. Again….WOW!.

All the lights work on CHEVY DUCK.

photo by Kelly Attebury
That afternoon, my brother, Kelly, and I went to the beach where all the action was. There was a Puddle Duck race, which is always fun to watch. Next, there was a Marshmallow Scoop race. Marshmallows (actually they were peeps) are flung out into the water and the small vessels maneuver around and scoop up these marshmallows with a net provided them. Whoever gets the most marshmallows, wins. I was standing on the beach with Kelly, when I hear my name called out. I turn and my friend,John Goodman, the proud owner of CHEVY DUCK, asks if I would be his scooper. YES, I join him and take the net. I have to tell you that this was a blast. John is very skilled with CHEVY DUCK, and was able to put me in perfect position to scoop those peeps. Not long after we got started, the handle broke off and I lost my net. We skillfully recover it, but when Chuck Pierce lost his net due to the handle breaking…John and I went into pirate mode and snatched Chuck's full net from the water. But, we politely returned the net… empty. When the count was done, the winner of the Marshmallow Scoop race was team "Lezlie and John Goodman in CHEVY DUCK" with 224 peeps!

It was an awesome weekend. I finally met Jackie Monies and Sean Mulligan, attend a Sail Oklahoma, met many wonderful people, and I got to spend time with my brother. I was able to see the boat that I spent so much time with, and sail her. There are so many memories, good and bad, attached to that boat named SCOUT. She knows many secrets told her during troubling times in my life. She was my BFF. There are blood, sweat and tears, literally, soaked deep into her wood. When I saw her for the first time since I left Texas, my heart jumped and tears came to my eyes. I was glad I was alone with her, we had our moment. Do I regret selling her? In a way I do, but I have started a new life, and I don't want to drag the bad memories attached to her, into this new life. She is where she is suppose to be, and if I want to sail her, Sean has extended the offer to visit any time.

I was asked if I was going to build another boat. Probably, I want to, and have two in mind. A place to build and then store, is the only problem I have. But, this weekend has awakened the building bug and you will have to stay tuned to see which one I build. But first, I will help my boyfriend finish building his bait boat. What is a bait boat, you ask? Check back next week and find out.


Friday, October 12, 2012

TARDIS HAS A TRAILER

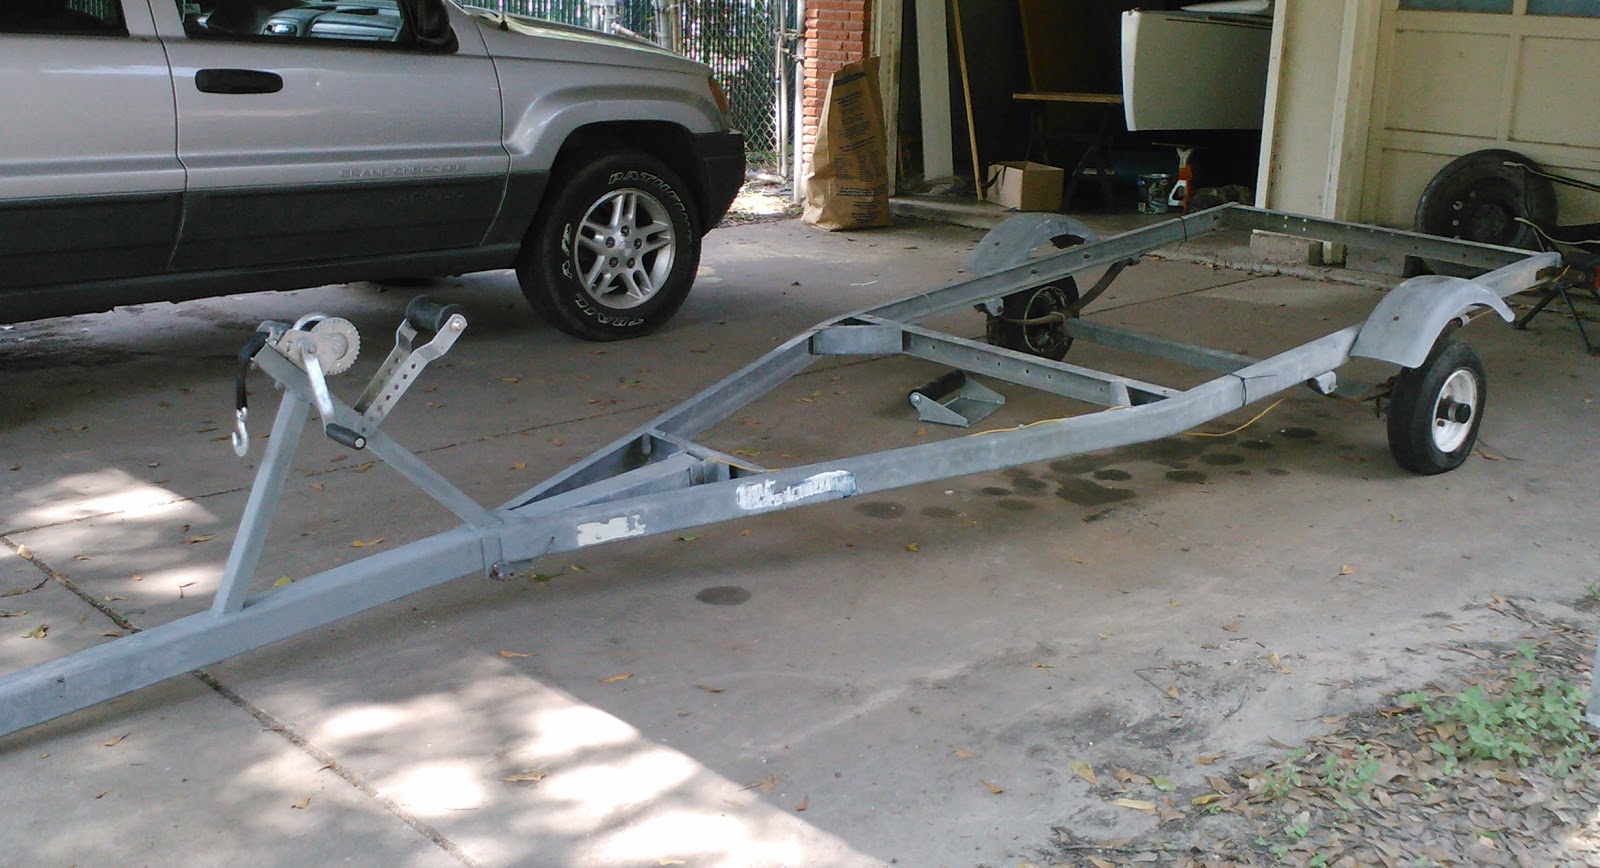
TARDIS has spent her whole life on a dolly I made for her, and out of the elements in a garage.  It was time for her to grow up and live outside, so she needed a trailer.


My neighbor in Pasadena,  Larry,  said he would help me make the trailer I bought, fit TARDIS.
We decided the axel should be moved forward twelve inches.  That would put it under and to the back of the area of the ballast.  Larry went to work, and he has the knowledge and all the tools to do a good job.


Next, two crossbars were made from angle iron and were spaced evenly along the frame.  These were needed to mount the rollers that TARDIS will rest on.


The wench bracket was cut off and a short piece of angle iron was welded to both the front and aft leg.  With holes drilled in each piece, Larry bolted the wench with two U-bolts he made from all-thread.  He did it this way so it will be adjustable.


TARDIS was loaded onto the trailer to see how it fit.  Larry had to drill a few more holes for the front rollers.


One of the tires on the trailer had a leak.  I decided to go ahead and buy two new tires.  These look better.


The lights didn't work, so it has new lights and wiring now.  Oh, and it now has a trailer tongue jack.  After Larry got through, it didn't even look the same, and it fits TARDIS perfectly.  Larry did a fantastic job.  We wieghed the tongue with TARDIS on the trailer, and it weighed 148.  The ballast is not in place yet, so that will add a few pounds, but not many.


She trailed behind my Jeep very well, and now sits patiently in a fenced yard  by the canvas shop, waiting for her hardware.


Monday, September 3, 2012

This and That


Today I installed half of the insulation and the window in the sliding hatch. I need more of the blue mat that I am using for the insulation. The window went in very easy, and I think it looks nice.


The cabin rails are bolted on now. Since there is nothing to tie fenders to at midship, I installed a padeye at both ends of the cabin rail.

The pin stripe is painted. I will add a fancy .... something ... at both ends. Just haven't figured out what yet.

My friend, Charlie Jones, gave me some lead for my ballast. I will make more lead pigs this week. AND, I am making my sail this week.... look for that post by the end of the week! Exciting times!

Monday, August 13, 2012

NON-SKID


There are several different ways to create a non-skid surface on your deck. I liked the non-skid that Charlie Jones has on Traveler, so that's what I used on TARDIS. It was easy to apply, using a 1/8 inch roller. I am very pleased with the results.

To tape off the area, I went to O'Reilly Auto Parts and bought 1/4 inch pin stripe. It goes on easy and lays flat in the turns. Then I used the blue painter's tape too.

All the varnishing is completed now.
The sail kit has been ordered.
This week will be used for gathering hardware, and looking for a trailer. This build is coming to an end, THANK GOD!!!!

It has been fun, but I'm ready to get on the water. The next chapter of my life will start on the day I splash TARDIS! When will that be, you ask? I'm shooting for September 8th.


Saturday, July 28, 2012

VENT TRUNK


Today, I pulled TARDIS out of the garage to step the mast. My neighbor, Larry, came across the lawn carrying a couple of beers. He rarely comes over empty handed. :-)

The third coat of paint has been spread, and I think that's all she will get. A non-skid will be applied to the deck also.

The vent trunk on a Paradox is unique. The halyard and furling line come through the deck into the vent trunk, and then into the cabin. At the bottom of the mast step, there is a drain hole. The electrical box is mounted to the left of the vent trunk. The batteries will be on the other side of the bulkhead the box is mounted on.


Wiring for the running lights will come down through the mast, exit the mast below the deck, and will plug into the harness mounted inside the vent trunk. The hole for the wires to go to the box has not been drilled yet. Wires have already been run from the box to the pump located in the aft storage space.


A list has been made of all the hardware that is needed. The sail will be purchased as a kit from Sailrite. Oh yeah, and a trailer.

Sunday, July 15, 2012

TARDIS Has Paint!


I can't seem to paint anything without getting it in my hair! Today was no different, but I'm so excited that there is paint on s/v TARDIS. I was asked how many coats I was going to apply. My answer, "I don't know." Maybe three? I will know when I get to the last one.


I decided to use the Glidden Porch & Floor, off white. A navy blue stripe will be painted just below the toe rail.

I love the look of wood! So, of course, I will not paint everything. Many pieces will be painted with spar varnish; toe rail, hand rails, hatch board, cabin rails, mast, boom, spar, rudder stock and tiller.


I am also asked about my splash date... and again, my answer is, "I don't know". But one thing I do know, there will be a party at the splash!

Saturday, April 7, 2012

FAIRLEAD


Zoe... may she rest in peace... had a built-in fairlead. It looked really cool and I wanted TARDIS to have one too. I took a 1 3/8 inch bit and drilled the hole. I didn't know what angle was best, so I just started drilling and hoped for the best. I didn't realize I was digging into the deck about halfway through, so I used my extension to finish.


It turned out to be a very clean trench. I was pleased. The 1" PVC was trimmed to the right length and then shaped before I glued it into place. I thought it would be easier this way.

After the PVC was glued in, I applied 4 layers of fiberglass and then faired it. Some more sanding it needed for a smooth finish. My neighbor stopped by yesterday, and then a friend came over, so my sanding was cut short. I felt like I needed to post my progress this morning, so the finished product will be posted at a later date.


Sunday, April 1, 2012

TILLER


I've been working on the tiller. It is 7 layers of solid lumber glued and clamped. I didn't think I could handle all 7 at one time, so I did 2 or 3 at a time. It turned out nice.


The handrails for either side of the companionway are now cut and ready for the finish.


Tuesday, March 20, 2012

MAST CONSTRUCTION


I just realized this week, that I never posted anything about the making of the mast. So, here goes.

On page 12 of the Paradox plans, are the drawings for the mast. When I first looked at them, I had that "deer in the headlights" look. I studied them for several days before I finally said, "Ah, I get it."

There are two views of the mast. It appears as one, because the horizontal lines continue from one to the other without a break. The drawing on the left, is the side view from port. This gives you the dimensions for the width of the side pieces, and the thickness of the front and back. The back of the mast is flat, so all measurements are taken from this side.

On the right side of the drawing is the view from aft, or forward, because they are the same width. The view is of only half of the mast since both the port and starboard sides are the same. If you look closely, you will see the CL written on the center line between the 500 and 900 marks. This view will give you the width of the aft and forward pieces, and the thickness of the side pieces.


I wanted running lights on the masthead, so I secured 1/2 inch plastic tubing in the center of the mast, exiting out the center of the masthead and the port side in the vent trunk. This will let me easily run wires to install the running lights, and to do any repairs later if I need to.

The plans call for a block to be installed within the mast head for the halyard. Through my research, I learned that several have abandoned the original design, and attached a block on the outside of the mast. I decided to go with this method. Seemed easier and better.


Tuesday, March 13, 2012

TILLER & RUDDER STOCK


Through the whole build, when I came across a part that was a little difficult, I would put it aside and go on with something that was easier. It has now come down to all those more difficult jobs.

Yesterday, a friend of mine came over, handed me a bag and said, "here". I opened it and squealed with excitement. Obviously, he saw my worn out jigsaw! I get to use his to finish my build. By the look on his face, I guess he has never seen a woman get that excited over a power tool.

I have been putting off cutting the hole in the transom for the tiller. It seems wrong to cut a big hole that close to the waterline. The pintle and gudgeon was ordered from Duckworks, and I installed it today. The lower gudgeon is not completed yet, so I just drilled a hole in scrap wood to simulate the gudgeon. After marking approximately where the tiller will meet the transom, I drilled a couple of holes. With jigsaw in hand, I started the cutting. And it cut so smooth!!!!

The tiller will be made next. Hopefully, that post will be up in a few days. We'll see...

Sunday, February 26, 2012

Sliding Hatch - Part 3


The sliding hatch is well on it's way to being finished. The underside is glassed, and the last piece is curing as I write this.


The companionway hatch board is cut. A window will be put in it later.

My neighbors have been curious enough to come over and see what I'm building. And, I get the same questions:

"How did you learn how to do this?"
"What made you want to build a boat?"
"Did you do this by yourself?"
"How long have you been working on it?"

I don't mind answer all the questions, I enjoy showing the boat off. It makes me feel good that people admire the work I have put into this project. I looked back on my notes, and I started TARDIS on May 18, 2010. I do hope to have her in the water by May 1, 2012. Wish me luck!

Tuesday, February 21, 2012

Sliding Hatch - Part 2


Today I cut out the ply and glued the fore and aft beam to the hatch. Tomorrow, after it cures, I will glue on the sides and the mid-beam.

Sunday, February 19, 2012

Sliding Hatch


The jig for making the sliding hatch is made. All the beams are made. The sides for the hatch are glued up and curing tonight.

I'm using the poor man's clamp for the sides to the hatch. These are 4 inch PVC pipe cut into 1 1/2 inch lengths, and then cut one side for an opening. These are very good for some applications. I also have made clamps out of 2 inch PVC.

Progress has been slow the last couple of weeks. Other things have needed my attention. But, like the turtle ... slow and steady wins the race.

Tuesday, February 7, 2012

RAILS


The top is fiberglassed. The outside rails are cut. I decided to make the sliding hatch before I glue and bolt the outside rails in place.

I was dreading having to buy lumber to build a form for the construction of the hatch. A few days ago, as I carried the trash to the curb, I noticed a pile of scrap lumber down the street. Well, I immediately went down to find anything I could use for a form. I ended up dragging four boards home that I can use. Why buy when you can find stuff for free! I'm thrifty that way!


Tuesday, January 31, 2012

NOT TOPLESS ANYMORE!


I was so excited when I got the top glued on. I climbed inside and sat down, looked around, and was a little amazed that I built this. I have tried to concentrate on the "pieces" and not the project as a whole, because when I do that I get overwhelmed. So, I have always taken it one step at a time. Baby steps.

The fiberglass goes on next before the other part of the railing for the sliding hatch.

Okay, enough patting myself on the back, and get out there and fiberglass that top I'm so proud of.